Individual Effort:
No team participation is really encouraged in the case of the homeworks or the labs. If you need to use code you found online, you need to (1) check with us whether this is ok, (2) clearly mark it and (3) mention it in the readme file of your submission. If you fail to do one of these, it will be treated as academic misconduct.
Late Submission:
Don't get behind in the lab assignments - always start early!In this course you will have a total of 4 (four) grace days that you can distribute however you like. See here for more information on grace days.
Forum:
There is a forum at Moodle. (Note: Please make use of the forum. Help each other, but don't copy homework!)Objectives:
- To develop a ray tracer.
- To understand ray tracing and implement a ray tracer!
- To create some nice color images
In this lab you are writing a ray-tracer. After some basic features you will extend it to include some interesting effects. You should not use any OpenGL/WebGL in this assignment. You can use any programming language you want, as long as your programm compiles and runs on the lab PCs (Ubuntu) without installing additional environments (This should work at least with Java and C++).
Hint: We all love JavaScript, but writing a ray tracer with it is not the best decision. Unless you have a lot of time...
Submission Guidelines
Your project must build and run on the Ubuntu environment on our lab PCs. You must not submit prebuilt binaries. Your project should compile and run on the lab PCs without errors and without requiring extra configuration. Make sure to submit all the required files and to test it in time! A program that fails to compile will receive 0 points. No exceptions.
We encourage you to use either make or CMake to build your application. Make sure to keep your build system simple! It should only be a simple >>make (or similar) for us to build the project. We are not going to set up complex and weird build systems and spend 30 minutes to build your project.
If you have very good reasons to not use either make or CMake, make sure to document how to build your project. But it still should not be more than 1 or 2 simple commands!
Be sure to submit any comments or remarks in a 'readme.txt' file.
Submit your files on Moodle.
A word of Warning:
We will NOT (under any circumstances) accept submissions that do not compile and run on the lab PCs. Please test your submission on one of the lab PCs before you submit it. Check also that you included everything to compile your project. There will be absolutly no exception.
Tasks:
(100%) Required Tasks
- (10%) Output a valid black image file (you will get many of them when continuing and this will be the only time you need them).
- (10%) Be able to read in the xml file of the specification.
- (25%) Output an image with spheres on it after ray tracing them.
- (25%) Be able to read in geomtery from the specified xml files. (example1.xml)
- (30%) Implement basic Phong illumination and shading. (example2.xml)
Hints and Tips:
You should feel free to design your program as you see fit, however, the following progression will make life easier for you:
- Create a valid image. You can use any format you want, as long as it could easily be displayed on the lab PCs. If your programming environment does not support writing formats like PNG or JPEG you can also use the PPM format.
-
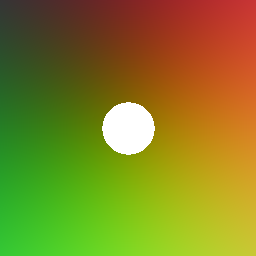
Create a default camera and rays.
Encode the ray direction as RGB and write it to an image to help debug your ray generation. The following image is an example of what the image should look like (r=x, g=y, b=z).

-
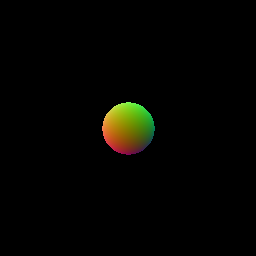
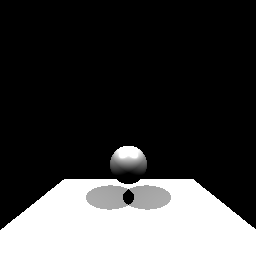
Create intersectable surfaces.
The following images show a reasonable progression. In the first image, white is a positive sphere intersection test. In the second image, the sphere is shaded based on the normal at the intersection point:
-
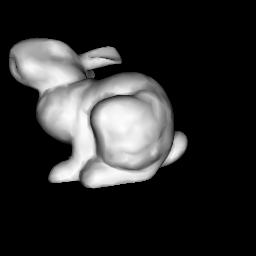
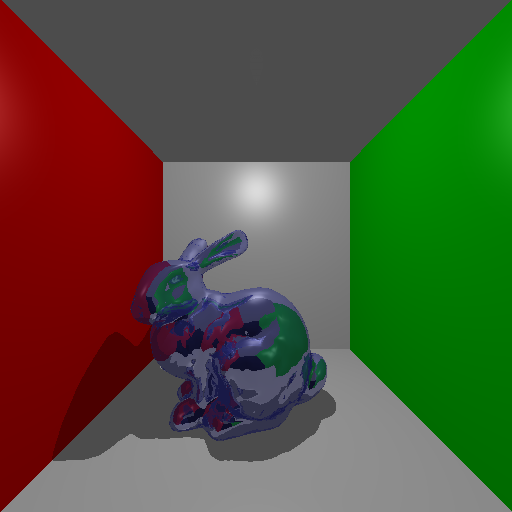
Implement simple materials such as a perfect Lambertian (as used for the bunny).
- Implement the full Phong illumination and shading.
-
Create a scene which contains multiple objects/lightsources.
Sometime during this step a scene file parser should be created.
-
Add shadows.
A scene with two light sources casting shadows:
-
Implement camera and object transformation.
A camera transformation.
-
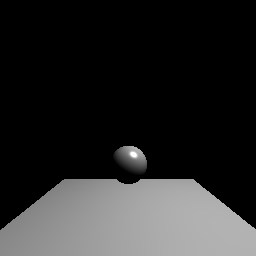
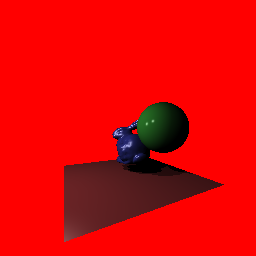
Implement effects.
In this specific case it is a simple reflection.
In general, some useful hints to observe:
- Use visual debugging by encoding data to RGB and outputting to an image.
- There are two tactics to perform transformations: Transform the rays or transform the objects. If you choose to transform the rays remember that you must use the inverse transformations!
- To transform the normal correctly, the transpose of the inverse transformation matrix must be used.
- Calculate the inverse transformation matrix as you receive the transformations.
-
Some useful sites to get you started:
Constructing eye rays
Intersection routines - While we are providing some very primitive shapes. I am encouraging you to create your own, more interesting shapes in a modeling program, such as the open source Blender.
Input Files:
Your raytracer should be able to read our xml based input file format:
Input file specification
The following input scenes will be used to grade your submission, so make sure that they are displayed correctly.
Download example scenes


Grading Criteria
Grading the labs will be based on the following:
- 80%: Correctness and adherence to assignment specification.
- 10%: Readability and structure of code, use of comments, indentation, etc.
- 5%: Efficiency and speed (only an issue if its very inefficient)
- 5%: Adherence to lab procedures (submitting, naming conventions, etc)
In order to get a full mark, you need to do all of the assigned tasks AND adhere to to lab procedures while creating readable and efficient code. I.e. if you accomplish only 70% of the tasks correctly, but you do not adhere to lab procedures, your final mark will be 70*(1-0.05) = 66.5%.
Last modified: September 29, 2018 Manfred Klaffenboeck / manfred DOT klaffenboeck AT univie DOT ac DOT at